Showing posts with label Sharepoint. Show all posts

Thursday, October 30, 2014

Add an XML file as a data source

Add an XML file as a data source


Your enterprise is storing more and more data in XML files. To make this data more accessible on your site, you want to use these XML files as data sources. With Microsoft SharePoint Designer 2010, you can easily add a connection to an XML file as a data source. After you connect to the XML file, you can create a view of data in the XML file by creating a Data View. To learn more about Data Views, see the article Create data views.
You can add an XML file as a data source to your site in any of three different ways. You can:
  • Create an XML file in SharePoint Designer 2010 and save it as part of your Web site.
  • Import an XML file from a file or folder on your computer or network.
  • Connect to an XML file that resides on an external server.
When you create or import a new XML file, a corresponding connection automatically appears in the Data Sources list in the Navigation pane. By default, every XML file in a site has a corresponding data source connection in the Data Sources list.

What do you want to do?

Create an XML file

When you create an XML file in SharePoint Designer 2010 and save it as part of your Web site, a corresponding data source connection automatically appears in the Data Sources list.
  1. On the File menu, click New.
  2. In the New dialog box, on the Page tab, click General, and then click XML.
  3. Click OK.
    A new XML file with an XML DOCTYPE declaration (<?xml version="1.0" encoding="utf-8" ?>) opens in your Web site.
  4. In SharePoint Designer 2010, position the insertion point after the XML DOCTYPE declaration, and then press ENTER to begin your XML file. After you create your XML file, make sure that the </xml> closing tag is included.
  5. On the File menu, click Save As.
  6. In the File name box, type a name for your XML file, and then click Save.
NOTE   
  • When you work with an XML file as a data source, the XML file must contain only well-formed XML. Invalid markup may cause errors. To validate the XML file, open the XML file, and click the Edit tab on the ribbon, and under Code Formatting, click Verify well-formed XML.
  • In addition, either the XML file must contain and conform to a schema, or it must contain data from which a schema can be inferred.

Import an XML file located on your computer or network

When you import an XML file into a site, a corresponding connection automatically appears in the Data Sources list.
  1. Click Data Sources in the Navigation Pane.
  2. On the Data Sources tab on the ribbon, in the New group, click XML File Connection.
  3. In the Data Source Properties dialog box, in the Location box on the Source tab, type the path to the XML file that you want, or click Browse to locate and select it.
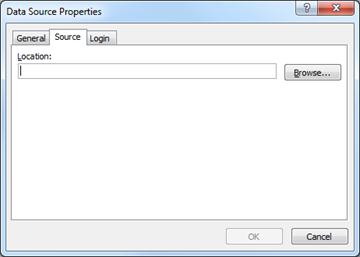
    Location box on Source tab in Data Source Properties dialog box
  4. Click OK.
NOTE   
  • When you work with an XML file as a data source, the XML file must contain only well-formed XML. Invalid markup may cause errors. To validate the XML file, open the XML file in SharePoint Designer 2010, click the Edittab on the ribbon, and under Code Formatting, click Verify well-formed XML.
  • In addition, either the XML file must contain and conform to a schema, or it must contain data from which a schema can be inferred.


Connect to an XML file located on an external server

When you connect to an XML file located on an external server (unlike when you import an XML file on your own computer or network), you do not import the file to your site. Instead, you link to it directly by using the URL of the external XML file.
  1. Click Data Sources in the Navigation Pane.
  2. On the Data Connections tab, in the New group, click XML File Connection.
  3. In the Data Source Properties dialog box, in the Location box on the Source tab, type the URL for the XML file that you want, or click Browse to locate and select it.
  4. Click OK.
    If the XML file resides in a site that requires a user name and password, you are prompted to provide these credentials.
  5. The XML file may also require logon credentials beyond those for the current Microsoft SharePoint site. You might need a user name and password to change the properties or to access the data, for example. If you know that you need additional credentials, click Login tab in the Data Source Properties dialog box, and then click one of the following options:
    • Don't attempt to authenticate     This option either attempts an anonymous connection or supplies the current team member's credentials. Select this option if the XML file is not password-protected or if you want to require team members to use their user names and passwords to access any protected files.
    • Save this user name and password in the data connection     This option stores the provided user name and password so that anyone can access the file. Use this option if you want to bypass any existing password protection by typing the user name and password in the corresponding boxes.
    • Use Windows authentication     This option uses the current team member's user name and password. This option works only when Microsoft SharePoint Foundation and the XML file are located on the same server.
    • Use Single Sign-On authentication (requires Microsoft SharePoint Server 2010)     This option is only available when your site is part of a portal site created by using Office SharePoint Server 2010 and when the administrator has enabled and configured Single Sign-On authentication. If you want to use Single Sign-On authentication, select this option, and then click Settings. In the Single Sign-On Settingsdialog box, do the following:
      • In the Application Name box, type the application name for your database.
      • In the Application field to use as the user name box, type the name of the field in which your user name is stored.
      • In the Application field to use as the password box, type the name of the field in which your password is stored.
        If you do not have the necessary information, contact your server administrator.
Note:
Alternatively you can open SharePoint designer 2010 fo to All Files on Navigation pane and then click Import files option from Menubar items,then select the XML file created in your local computer system ,then you can add that file in your infopath as datasource and use.

Friday, October 24, 2014

Taxonomy in sharepoint 2013

Taxonomy

A taxonomy is a formal classification system. A taxonomy groups the words, labels, and terms that describe something, and then arranges the groups into a hierarchy.
People construct taxonomies for almost any kind of information, from biological systems to organizational structures. For example, biologists group living organisms into four major classifications: animal, plant, fungus, and microbe. Each of these major groups has many subdivisions. Together, the whole system is a taxonomy.
Organizations create taxonomies in too many ways to list. They create Chart of Accounts taxonomies to manage accounting systems, organization charts and job classifications to manage employees, product catalogs and so on. All these taxonomies are structured hierarchies of information; formal classification systems that help people handle information.

Folksonomy

A folksonomy is an informal classification system. It is evolves gradually as web site users collaborate on words, labels, and terms on a site. Originally, folksonomies developed from popular applications such as bookmarking.
If you have ever seen a tag cloud on a website, then you have seen a visualization of a folksonomy. The following figure shows a tag cloud on a SharePoint site.

Tuesday, September 30, 2014

"The file that you selected could not be found. Check the spelling of the file name and verify that the location is correct" when calling ExceService.OpenWorkbook in sharepoint with non adiministrator priveleges

Few days ago ,I have the same probelm with you ,and later I have figured it out,the Solution as follows:
The problem you must configure alternate access mappings which in  System Settings of SharePoint 2010 Central Administration.
you should select you local application,such as Http://sharepoint:22222, and Edit Public URLs ,in the internet box you fill your internet url ,then
click ok,and test, I think you will find it's OK.

Tuesday, September 16, 2014

Get Modal Popup sharepoint 2010


  • Create a share point visual web part project and add below to the ascx page 
  • Create A Parent page and child page
Parent Page---> where web part is deployed
Child Page -- >  which you want to see in popup


protected void Page_Load(object sender, EventArgs e)
        {
            ShowBasicDialog(appSettings, "Announcements");
        }


        private void ShowBasicDialog(string Url, string Title)
        {
            //string heignt = "400";
            StringBuilder sb = new StringBuilder();
            sb.AppendLine(@"<script type=""text/ecmascript"" language=""ecmascript"">");
            sb.AppendLine(@"ExecuteOrDelayUntilScriptLoaded(openBasicServerDialog, ""sp.js"");");
            sb.AppendLine(@"    function openBasicServerDialog()");
            sb.AppendLine(@"    {");
            sb.AppendLine(@"        var options = {");
            sb.AppendLine(string.Format(@"            url: '{0}',", Url));
            sb.AppendLine(string.Format(@"            title: '{0}',", Title));
            sb.AppendLine(string.Format(@"            height: '{0}',", "550"));
            sb.AppendLine(string.Format(@"            width: '{0}'", "550"));
            sb.AppendLine(@"        };");
            sb.AppendLine(@"        SP.UI.ModalDialog.showModalDialog(options);");
            sb.AppendLine(@"    }");
            sb.AppendLine(@"</script>");
            ltScriptLoader.Text = sb.ToString();

            //<br>iframe<br>{<br>    background-image: url("../images/animatedspinner.gif");
        }
    }


add below key to app settings in web.config
  <add key="SPUrl" value="http://localhost:99/SitePages/Home.aspx" />

Sharepoint Get image URL and Details from sharepoint Picture Library

 public void dispImgItems()
        {
            SPSecurity.RunWithElevatedPrivileges(delegate()
            {
                using (SPSite mySiteCollection = new SPSite(appSettings))
                {
                    using (SPWeb web = mySiteCollection.OpenWeb())
                    {
                        SPList LstPicture = web.Lists["AnnPictureLibrary"];
                        List<ImageCollection> lsts = new List<ImageCollection>();
                        foreach (SPListItem item in LstPicture.Items)
                        {
                            if (item["Active"].ToString() == "Yes")
                            {
                                string ImageUrl = Convert.ToString(item["ows_EncodedAbsUrl"]);
                                string ImageName = Convert.ToString(item["Title"]);
                                lsts.Add(new ImageCollection(ImageUrl, ImageName));

                            }
                        }
                        //Image1.=
                        Image1.AlternateText = lsts[0].Name;
                        Image1.ImageUrl = lsts[0].URL;
                        Image1.Height = 400;
                        Image1.Width = 400;
                    }
                }
            });
        }
    }

Sunday, August 31, 2014

How to use log4net in SharePoint based Applications

How to use log4net in SharePoint based Applications


In my current project the requirement is to use log4net as the main logging mechanism to log the errors and exceptions generating from SharePoint based applications. Before this we have used log4net in many .Net based applications and that is pretty much simple to configure and to use. Unfortunately when we implemented log4net the same way in our SharePoint based projects, it failed miserably. So, we started googling and found this is a known issue but we are unable to find out a proper step by step solution to resolve the issue. Fortunately we find out some interesting facts and mechanism to overcome this issue in Mike Knowles bloghttp://mikeknowles.com/blog/2009/02/17/ConfiguringLog4netForSharePointWindowsAuthentication.aspx. So, we thought to collect all the information’s in a single place and to share with you guys. So, let’s start:

Step I

Create your own web app -> Site Collection -> Site.

Step II

Deploy the log4net DLL to the GAC.

Step III

Open your Site’s Web.Config file from Inetpub -> wwwroot -> wss -> virtual directories -> port-no -> web.config
Now, add an entry to the Web.config configSections to register the new configuration block:
<section name="log4net" type="log4net.Config.Log4NetConfigurationSectionHandler,log4net" />

Next, create a folder named ‘App_Data’ inside ‘Inetpub -> wwwroot -> wss -> virtual directories -> port-no’ folder. Inside App_Data create another folder named ‘Logs’ and inside ‘Logs’, create a text file named ‘RollingFileLog.txt’. Give full Control permission to these 3 file/ folders.
Now add the log4net configuration section to Web.config just prior to the system.web section.
<log4net debug="true">
    <appender name="GeneralLog" type="log4net.Appender.RollingFileAppender">
      <file value="App_Data\\Logs\\RollingFileLog.txt" />
      <appendToFile value="true" />
      <rollingStyle value="Composite" />
      <datePattern value="yyyyMMdd" />
      <maxSizeRollBackups value="10" />
      <maximumFileSize value="1MB" />
      <layout type="log4net.Layout.PatternLayout">
        <conversionPattern value="%d{dd MMM yyyy HH:mm:ss} [%p] %c - %m%n" />
      </layout>
      <securityContext type="log4net.Util.WindowsSecurityContext">
        <credentials value="Process" />
      </securityContext>
    </appender>
    <root>
      <level value="ALL" />
      <appender-ref ref="GeneralLog" />
    </root>
  </log4net>

Now add log4net assembly information in the ‘SafeControl’ section:
<SafeControl Assembly="log4net, Version=1.2.10.0, Culture=neutral, PublicKeyToken=1b44e1d426115821" Namespace="log4net" TypeName="*" Safe="True" />

Step IV


Now open your Visual Studio solution. Right Click on the Solution Node and add a new project of type Class Library. Give it a proper name like ‘log4netModule’ as we are actually in a process of creating one HTTP Module. Add reference to log4net dll. Add a strong key into the project.
Add a class file or use the default one. Place the following code inside that file:


using System;
using System.Collections.Generic;
using System.Linq;
using System.Text;

using System.Web;
using log4net;
using log4net.Config;
using log4net.Util;

[assembly: log4net.Config.XmlConfigurator(Watch = true)]
namespace XXX.log4netModule
{
    public class Initlog4netModule : IHttpModule
    {
        public void Init(HttpApplication context)
        {
            XmlConfigurator.Configure();
        }

        public void Dispose()
        {            
        }        
    }
}

Compile it and copy the error free assembly from the source location.

Step V


Place assembly copied in the last step, inside the ‘bin’ folder present inside the ‘Inetpub -> wwwroot -> wss -> virtual directories -> port-no’ folder. And deploy the same copied assembly into the GAC.
Now, again we need to update the web.config file. Place the following line inside the ‘<httpModules>’ section present inside the ‘<system.web>’ section and modify it as per the name you have given to your project.
<clear />
<add name="Initlog4netModule" type="AZL.log4netModule.Initlog4netModule, AZL.log4netModule, Version=1.0.0.0, Culture=neutral, PublicKeyToken=4f97192e309c5502" />

Step VI


Open the IIS7 Administration tool via the Start menu, typing in inetmgr.exe in the start/search box and pressing Enter. In the tool, double-click on your server node in the left-hand treeview, then expand the “Sites” node, and double-click on the site or application to which you would like to add your module and handler.
Select the “Modules” feature icon, then click the “Add Managed Module …” action, and in the resulting dialog box type in the module name (arbitrary) and then select the type in the dropdown box, as the tool will automatically load your assembly in bin and discover types that implement the IHttpModule interface. Press OK to add the module.
clip_image001[4]
Reset IIS.

Step VII


Now, open up your original solution in visual studio. In the desired page add a reference to the log4net assembly.
using log4net;

Next, to test if at all log4net is working or not, place the following lines inside your page load event:


ILog log = LogManager.GetLogger("TestLogger");
log.Debug("Error logged");

Save and compile and run the solution.
If you have followed all the steps perfectly, then the log file present inside the Logs folder should have the following entry:

“<Date Time>  [DEBUG] TestLogger - Error logged”

Friday, August 22, 2014

Add multiple Office templates to a document library

Create a content type for a document template
  1. Go to the top level of the site collection and select Site Settings from the Site Actions menu.
  1. Under the Galleries section of the Site Settings page, click Site content types.
  1. Click Create at the top of the Site Content Type settings page.
  1. On the New Site Content Type page, do the following:
  • Type “PowerPoint” in the Name field.
  • Type “Create new presentation in this library” in the Description field.
  • Select Document Content Types from the Select parent content type from drop down list.
  • Select Document from the Parent Content Type drop-down list.
  • Click OK.
  1. On the Site Content Types > PowerPoint page, under Settings, click Advanced Settings.
  1. In the Document Template section, select Upload a new document template, click Browse, and then double-click a PowerPoint slide or template that you want to use.
  1. Click OK.
Display the new template as a choice when creating new documents
  1. Navigate to the library to which you want to associate the new content types.
  1. On the Library tab of the ribbon, click Library Settings. If you are working with a list, click List Settings.
  1. Under General Settings, click Advanced Settings.
  1. In the Content Types section, click Yes under Allow management of content types, and then click OK.
  1. On the Library Settings page, under Content Types, click Add from existing site content types.
  1. On the Add Content Types page, select All Groups under Select site content types from.
  1. Under Available Site Content Types, look for and select the new content types to associate to this library and click Add.
  1. The next time you click New on the ribbon for the library you want to add items to, the new template content types appears as choices in the drop-down list.
Save your customized library as a template
  1. Go the Document Library that you want to save as a template.
  1. Under Library Tools in the ribbon, click the Library tab.
  1. In the Settings group of the ribbon, click Library Settings.
  1. Under Permissions and Management, click Save document library as template.
  1. Type the file name, the template name and template description in the fields provided.
  1. If you want document libraries created from this new Document library template to include the items already in the document library, select the Include Content checkbox.

 NOTE    You must be a site collection owner to successfully complete this procedure.
  1.  NOTE    Note that, by default, the New Word content type exists under the Group Work Content Types section. This is typically the choice that is available to you when adding a new document to any Document Library.
    1.  NOTE    You must have Microsoft Office installed in order to create Office generated documents.
    1.  NOTE    You can also add a new Excel, OneNote or Word template by repeating the above steps for each file type.
       NOTE    You can create multiple and different templates of the same file type.

    Now that you have created content types for your PowerPoint, OneNote, and Excel templates, you need to add the content types to a Document Library. This step ensures that they will appear as choices from the New Document command on the ribbon.
    1.  NOTE    You can multi-select content types by pressing the <CTRL> key while clicking on several content types in the list.

    Now that you have created content types for your PowerPoint, OneNote, and Excel templates and added them to the Document Library, you can save this library as a template. In this way, you won’t have to repeat the steps above if you want something similar for another Document Library.
     NOTE    You must have Designer permissions to accomplish this task.


    http://www.codeproject.com/Tips/440704/Document-Library-Enable-New-Document-Edit-Document

Wednesday, August 20, 2014

Get List of wsp files deployed in Central Admin

using System;
using System.Collections.Generic;
using System.Linq;
using System.Text;
using Microsoft.SharePoint;
using Microsoft.SharePoint.Administration;
using System.Diagnostics;
//using ConsoleApplication1.ContactService;

namespace ConsoleApplication1
{
    class Program
    {
        static void Main(string[] args)
        {
            try
            {
                ContactServiceClient serv = new ContactServiceClient();
                Console.WriteLine("started");
                SPSolutionCollection solutions = SPFarm.Local.Solutions;
                Console.WriteLine("1");
                foreach (SPSolution solution in solutions)
                {
                    Console.WriteLine("2");
                    SPPersistedFile wspFile = solution.SolutionFile;
                    wspFile.SaveAs("c:\\Projects\\" + solution.Name);
                    Console.WriteLine(solution.Name);
                }
                log("main", "main method---------" + "hello", "Information");
            }

            catch (Exception ex)
            {
                log("main", "Exception in PopulateForm() ; Exception message : " + ex.Message, "Error");
            }

            Console.ReadLine();
        }


        #region Log info

        public static void log(string IPAddress, string Message, string logType)
        {
            if (logType == "Warning")
            {
                EventLog.WriteEntry(IPAddress, "Message : " + Message, EventLogEntryType.Warning, 233);
            }
            else
                if (logType == "Error")
                {
                    EventLog.WriteEntry(IPAddress, "ExceptionMSG : " + Message, EventLogEntryType.Error, 233);
                }
                else
                    if (logType == "Information")
                    {
                        EventLog.WriteEntry(IPAddress, "ExceptionMSG : " + Message, EventLogEntryType.Information, 233);
                    }
        }


        #endregion
    }
}

how to set read only-properties-to-the-particular-info-path-form-control-based

If you select the field and go to the "Fields" pane, you can add a rule (a Formatting Rule in this case) to do the trick. You have actions to "Hide this control" or "Disable this control" and you can base those actions on conditions (e.g. who is currently logged in).

Tuesday, August 12, 2014

How to find the Config sharepoint DB

How to find the Config DB

Configuration database connection string is stored in Registry key. So sharepoint look for that entry to identify the database.

In Sharepoint 2007 you could see the config DB conection string in Following Registry Key

My Computer\HKEY_LOCAL_MACHINE\SOFTWARE\Microsoft\Shared Tools\Web Server Extensions\12.0\Secure\ConfigDb


In Sharepoint 2010 you could see the config DB conection string in Following Registry Key

My Computer\HKEY_LOCAL_MACHINE\SOFTWARE\Microsoft\Shared Tools\Web Server Extensions\14.0\Secure\ConfigDb


The Next thing you have to find the Content DB attached to Web application.Here you have to remember one thing a web application could hold multiple site collection.So it will have multiple ContentDB


1. Go to Central Admin
2. Go to Application Management
2. Go to Database section and click on Manage Content Database
3. From the list Select your web Application
4.Click on the content DB  it will take to details page.
Content DB details page you could identify the DB Server

Thursday, July 31, 2014

Batch Updating List Items in Windows SharePoint Services 3.0

In Windows SharePoint Services 3.0, sometimes you must update multiple items in a list. Creating a foreach loop to iterate through a list item collection and performing an Update on each list item can be very intensive. An alternative approach is to construct a Collaborative Application Markup Language (CAML) string that contains a batch of commands to perform the updates and execute the commands by using the ProcessBatchData command of an SPWeb object. This Microsoft Office Visual How To demonstrates how to construct and execute a batch of commands to update text and date fields for all items in a list.
Code It
This example uses a document library named Processed Documents that contains a Processed yes/no field and Processed Date date field. You use a query to obtain a collection of items that have not been processed, as identified by theirProcessed value. You create a CAML statement to update the Processed and Processed Date fields for all documents in this library.
After setting up the variables, you instantiate an SPList object for the Processed Documents document library by first instantiating an SPSite object and then an SPWeb object that contains the library. After getting the SPList object, you construct and execute a query for all items in the library that do not have a Processed value of 1, that is, all items that have not been processed. The query returns an SPListItemCollection object of items that meet this criterion.
The next step is to build the CAML batch command that is used to perform the update. Each command includes a Methodelement with SetVar subelements. The SetVar elements define the type of command, the GUID of the list, the ID of the item, and the fields to update. The fields are defined in the format <schema>#<internal_field_name>.
As the update command for each item is created, it is appended to a StringBuilder object. After all the commands are created, they are placed in an ows:Batch element. This element contains an OnError attribute that defines what happens if an exception occurs while the commands are executed. In this example, execution stops on the first exception. The full XML string that defines the batch of commands is executed using the ProcessBatchCommand command of the SPWeb object. It returns a string that contains the results of each command.

// Set up the variables to be used.
StringBuilder methodBuilder = new StringBuilder();
string batch = string.Empty;
DateTime currentDate = DateTime.Now;
string formattedDate = SPUtility.CreateISO8601DateTimeFromSystemDateTime(currentDate);

string batchFormat = "<?xml version=\"1.0\" encoding=\"UTF-8\"?>" +
  "<ows:Batch OnError=\"Return\">{0}</ows:Batch>";

string methodFormat = "<Method ID=\"{0}\">" +
 "<SetList>{1}</SetList>" +
 "<SetVar Name=\"Cmd\">Save</SetVar>" +
 "<SetVar Name=\"ID\">{2}</SetVar>" +
 "<SetVar Name=\"urn:schemas-microsoft-com:office:office#Processed\">{3}</SetVar>" +
 "<SetVar Name=\"urn:schemas-microsoft-com:office:office#Processed_x0020_Date\">{4}</SetVar>" +
 "</Method>";

using (SPSite site = new SPSite("http://localhost"))
{
   using (SPWeb web = site.OpenWeb())
   {

      // Get the list containing the items to update.
      SPList list = web.Lists["Processed Documents"];
      string listGuid = list.ID.ToString();

      // Query to get the unprocessed items.
      SPQuery query = new SPQuery();
      query.Query = "<Where><Neq><FieldRef Name='Processed'/>
        <Value Type='Choice'>1</Value></Neq></Where>";
      query.ViewAttributes = "Scope='Recursive'";
      SPListItemCollection unprocessedItems = list.GetItems(query);

      // Build the CAML update commands.
      for (int i = 0; i < unprocessedItems.Count; i++)
      {
         int itemID = unprocessedItems[i].ID;
         methodBuilder.AppendFormat(methodFormat, itemID, listGuid, itemID, 1, formattedDate);
      }

      // Put the pieces together.
      batch = string.Format(batchFormat, methodBuilder.ToString());

      // Process the batch of commands.
      string batchReturn = web.ProcessBatchData(batch);
   }
 }
}

The query used in this example is intended to update a relatively small number of list items. As the number of items in the list, and therefore, the query, grow, you must take specific precautions to ensure optimal performance. Primarily, you should set the RowLimit property of the SPQuery object. This property defines the number of items returned per page. Because the returned page of data is in-memory, the value should be tuned based on memory limits, but should be less than 2000.
The RowLimit property is used together with the ListItemCollectionProperty and a loop to page through the results. In the following code example, which is based on the example in this Visual How To, the RowLimit of the query is set to return 100 items per page of data, and a do/while loop is used to page through all of the items.
query.RowLimit = 100;
do
{
   SPListItemCollection unprocessedItems = list.GetItems(query);

   //....process all the returned items in this page
   //....
   //....

   query.ListItemCollectionPosition = unprocessedItems.ListItemCollectionPosition;
} while (query.ListItemCollectionPosition != null);


To further optimize this example, you can place an index on the Processed column in the Processed Documents library.
Processing commands in a batch can be very helpful for developers. It is one of the faster methods for updating, and you can use batch commands for inserting and deleting items. Although this example shows how to do a batch update through the object model, you can also do batch processing through several Web services, such as the UpdateListItems method on the Lists Web service, and the UpdateDwsData method on the Dws Web service.
NoteNote
To correctly format the date, use the SPUtility.CreateISO8601DateTimeFromSystemDateTime method.

Tuesday, July 29, 2014

backup and restore sharepoint site or site sollection

Backup :

Backup-SPSite -Identity http://ServerName:port -Path "c:\backup\file.bak"


Restore:

Restore-SPSite -Identity http://Servername:port -Path "c:\backup\file.bak" -force

Thursday, July 24, 2014

JavaScript to hide or select specific tabs in SharePoint Ribbon

<script type="text/javascript">// <![CDATA[
function ResetRibbon() {
try {
var ribbon = SP.Ribbon.PageManager.get_instance().get_ribbon();
SelectRibbonTab("Ribbon.Read", true);
ribbon.removeChild('Ribbon.ListForm.Display');
ribbon.removeChild('Ribbon.ListForm.Edit');
} catch (e)
{ }
}
SP.SOD.executeOrDelayUntilScriptLoaded(function () {
try
{
var pm = SP.Ribbon.PageManager.get_instance();
pm.add_ribbonInited(function () {
ResetRibbon();
});
var ribbon = null;
try {
ribbon = pm.get_ribbon();
}
catch (e) { }
if (!ribbon) {
if (typeof (_ribbonStartInit) == "function")
_ribbonStartInit(_ribbon.initialTabId, false, null);
}
else {
ResetRibbon();
}
},
"sp.ribbon.js");
}catch(e)
{}
// ]]></script>
<script type="text/javascript">
function ResetRibbon() {
try {
var ribbon = SP.Ribbon.PageManager.get_instance().get_ribbon();
SelectRibbonTab("Ribbon.Read", true);
ribbon.removeChild("Ribbon.ListForm.Display");
ribbon.removeChild("Ribbon.ListForm.Edit");
} catch (e)
{ }
}
SP.SOD.executeOrDelayUntilScriptLoaded(function () {
try {
var pm = SP.Ribbon.PageManager.get_instance();
pm.add_ribbonInited(function () {
ResetRibbon();
});
var ribbon = null;
try {
ribbon = pm.get_ribbon();
}
catch (e) { }
if (!ribbon) {
if (typeof (_ribbonStartInit) == "function")
_ribbonStartInit(_ribbon.initialTabId, false, null);
}
else {
ResetRibbon();
}
} catch (e)
{ }
}, "sp.ribbon.js");
</script>